Introduction
In the realm of server management, virtualization has become an indispensable tool for optimizing resources and enhancing flexibility. Hyper-V, Microsoft’s virtualization platform, empowers users to create and manage virtual machines efficiently. In this tutorial, we’ll walk through the process of creating a virtual machine using Hyper-V in Windows Server 2016, 2019, or 2022.
Prerequisites: Before diving into the virtual machine creation process, ensure that your Windows Server is equipped with Hyper-V. This feature can be installed through the Server Manager or PowerShell. In a previous article, we have showed you how to install the Hyper-V role : If you haven’t yet installed Hyper-V, read the following article : How To Install Hyper-V In Windows Server 2016/2019/2022
To create a new virtual machine follow the below steps :
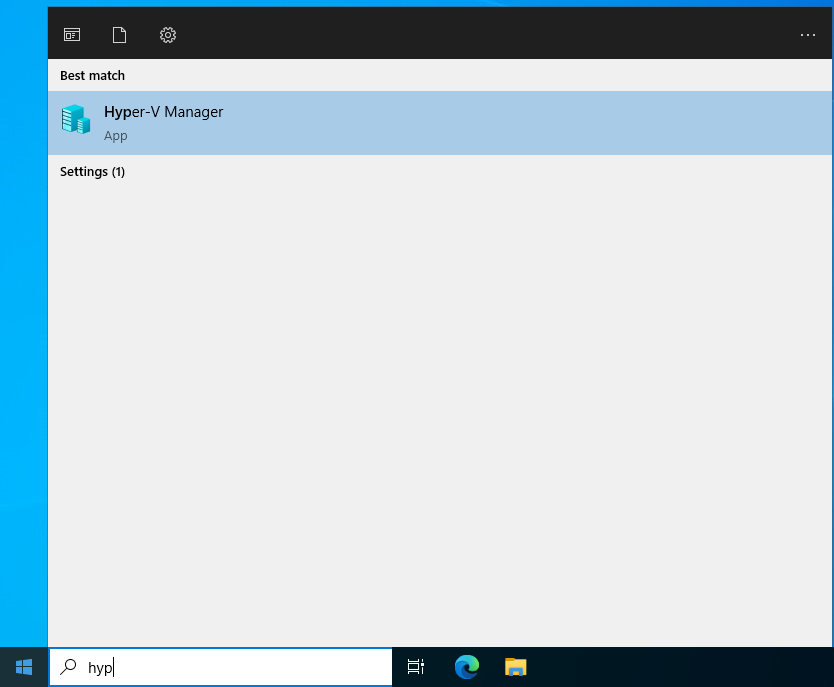
- Open Hyper-V Manager. Click on Start then typing hyper-v , then click on Hyper-V Manager
- Hyper-V management console will open
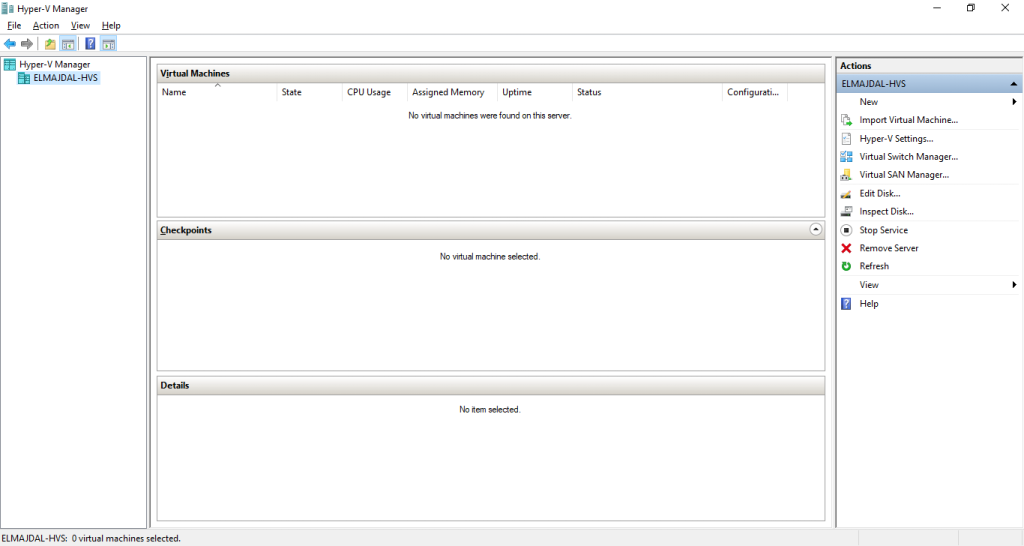
- From the Action pane, click New, and then click Virtual Machine.
 Or navigate to the left pane, right-click on the Hostname ( in my case ELMAJDAL-HVS), and choose New then Virtual Machine from the menu.
- On the Before You Begin page, Click the Next button.
- On the Specify Name and Location page, you will have to type the name of the Virtual Machine and choose a custom location to store the virtual machine in it.
Enter a name for the Virtual Machine, for example i will installing Windows 11, so I will name the virtual machine as Windows 11. If you want to store your virtual machines files in a location other that the default location, select the checkbox beside Store the virtual machine in a different location, click the Browse button and choose the new location. - Specify the generation of the Virtual Machine. For most scenarios, Generation 2 is recommended; to know the difference between the Hyper-V generations, read this article : What Is the Difference Between Hyper-V Generation 1 And Generation 2 Virtual Machines
Note: Make sure to read the above article, as it has detailed information for each supported guest operating system.
In this example, I will be setting up a Windows 11 64-bit version as a guest, so I will choose Generation 2
- On the Assign Memory page, specify the amount of memory (RAM) to allocate to the virtual machine. Adjust the slider according to your requirements and click Next.
I will assign 8GB RAM for the virtual machine . Click Next to continue
- On the Configure Networking page, Choose the Virtual Switch for utilizing the Virtual Machine’s networking.
Once the virtual machine network adapter is selected, click Next
- Configure the Virtual Hard Disk, setting parameters as per your preferences. Choose to create a new virtual hard disk or use an existing one. Set the size of the hard disk and click Next.
- On the Installation Options page, choose how you want to install the operating system on the virtual machine. You can install it later or use an ISO file for installation. Click Next to proceed.
Select Install an operating system from a a bootable image file, and browse to your .iso file
- Review your settings on the summary screen and click ‘Finish’ to create the virtual machine. Click the Finish button if everything is in order.
- The Virtual machine has been created and is now available inside Hyper-V management console.
- To initiate it, right-click and choose Start.
- To connect to the console of the Virtual Machine, right-click and select Connect.
- Proceed with the installation of GuestOS using the standard procedure.
- Once the installation is complete, the Virtual Machine with GuestOS is now operational.
Congratulations! You’ve successfully created a virtual machine using Hyper-V on your Windows Server 2016, 2019, or 2022. This virtualization technology opens the door to a more flexible and efficient server environment, allowing you to maximize resources and streamline your IT infrastructure.
Related article :
FIX For : This PC Can’t Run Windows 11 (Hyper-V)