


If you want to run virtual machines (VM) on Windows 10, you’ll need to install Hyper-V. Hyper-V is a hardware-based hypervisor that lets you run VMs in their own isolated spaces. You can run multiple VMs at the same time, provided you have enough resources like disk space, RAM, and CPU capacity. Hyper-V supports Windows, Windows Server, and Linux guest operating systems.
Virtualization provides a plethora of solutions from making the most of an organization’s hardware investment to running specific applications in other OS offerings. Windows 8 was the first Windows client operating system to include hardware virtualization support natively. Using the same technology found in Windows Server 2012 R2, the embedded Hyper-V client allowed IT professionals to move VMs from server to client without the requirement to re-learn the use of Hyper-V features and tools. Further enhancements were introduced in Windows 8.1 such as Enhanced Session Mode, enabling high fidelity graphics for connections to VM’s using the RDP protocol, and USB redirection which is enabled from the host to VM’s. Windows 10 brings further enhancements to the native hypervisor offering. These include:
Hot add and remove for memory and network adapters – works with generation 2 virtual machines running both Windows and Linux
Windows PowerShell Direct – the ability to run commands inside a virtual machine from the host operating system
Linux secure boot – Ubuntu 14.04 and later, and SUSE Linux Enterprise Server 12 OS offerings running on generation 2 virtual machines are now able to boot with the secure boot option enabled
Hyper-V Manager Down-level management – Hyper-V manager can manage computers running Hyper-V on Windows Server 2012, Windows Server 2012 R2 and Windows 8.1
Most modern Windows 10 and Windows Server devices meet the hardware requirements for Hyper-V. 4GB is the minimum RAM required but depending on the guest operating systems you plan to install in your VMs, you will probably need much more.
-
Windows 10 Enterprise, Pro, or Education
-
A 64-bit processor with second-level address translation (SLAT)
-
VM Monitor Mode extensions
-
At least 4 GB of RAM
-
Virtualization support enabled in the BIOS or UEFI:
– Hardware-assisted virtualization – Intel VT or AMD-V
– Hardware-enforced Data Execution Prevention (DEP) – XD bit
(Intel) or NX bit (AMD)
The easiest way to check if your device supports Hyper-V is using the systeminfo command line tool. Open a command prompt and run the tool.
Type cmd in the search box in the bottom left of the taskbar and then click Command Prompt in the list of results.
In the command prompt window, type systeminfo and press ENTER.
Scroll down the list of results to the very end and you’ll see Hyper-V Requirements. There are four requirements for Hyper-V compatibility and to the right of each you will see ‘Yes’ if your hardware meets them.
-
You can install Hyper-V through the Windows 10 Settings app.
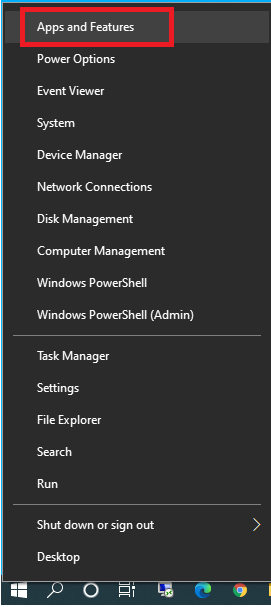
Right click the Windows button in the bottom left of the taskbar and select Apps and Features from the menu.
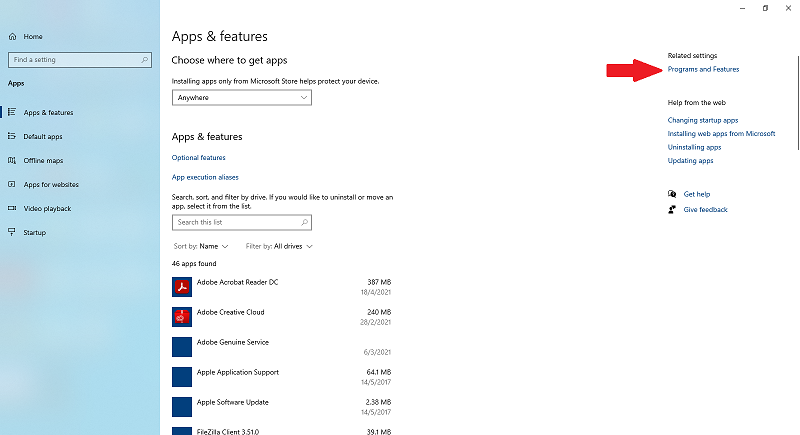
2. The Settings app will open. Under Related settings on the right of the Settings app, click Programs and Features
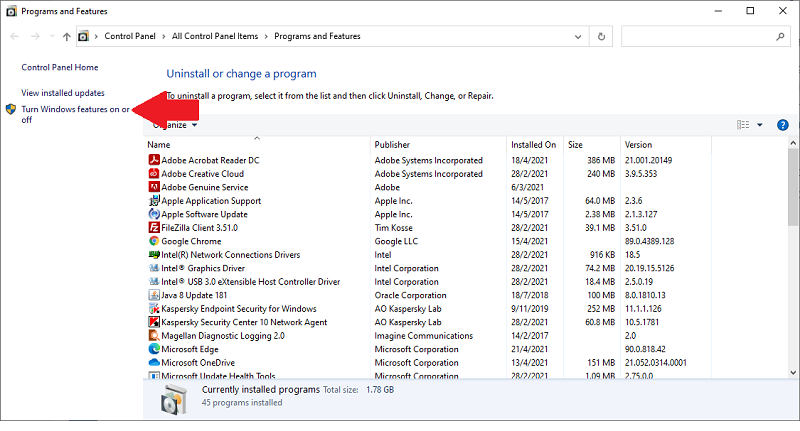
3. The legacy control panel will open. On the left of the control panel, click Turn Windows features on or off. You may be required to give consent or enter an administrator username and password to continue.
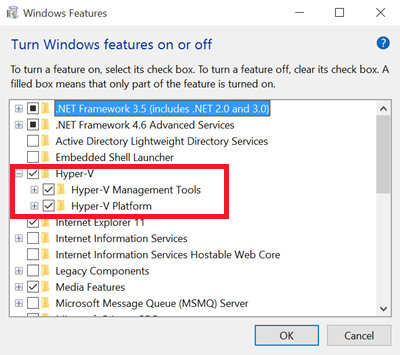
4. In the Windows Features dialog, scroll down the list of features until you reach Hyper-V. Check Hyper-V and then click OK.
5. Reboot Windows 10 when prompted.
And that is it! Once Windows has rebooted, you will be able to use Hyper-V to run virtual machines on Windows 10.