Introduction
Creating a new user account is a common operation for any computer being shared by multiple users.In Mac OSX, you have the option to create different types of users. In this article, I will be showing the different account types, and how to create a new user.
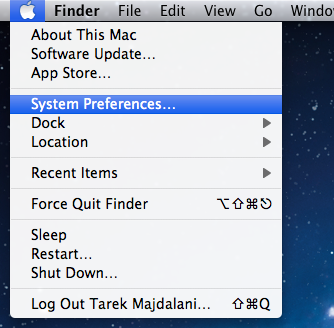
Open System Preferences. Do this by clicking on the Apple logo ![]() in the top left side of the screen and then click on System Preferences…
in the top left side of the screen and then click on System Preferences…
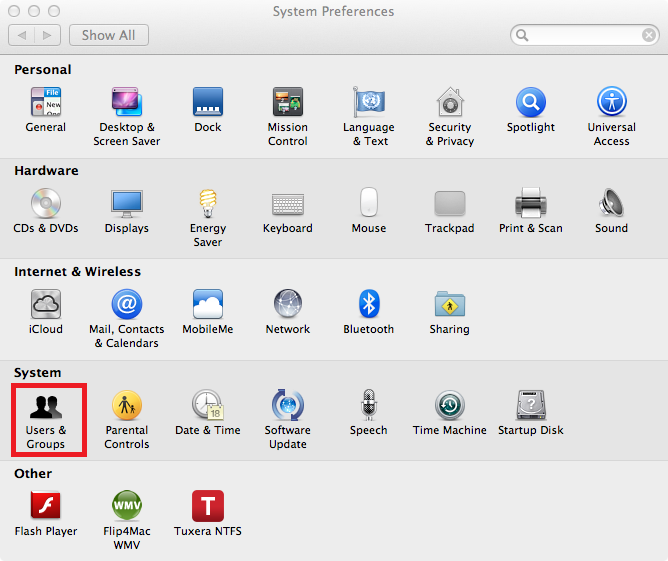
2. In System Preferences, under System, click on Users & Groups
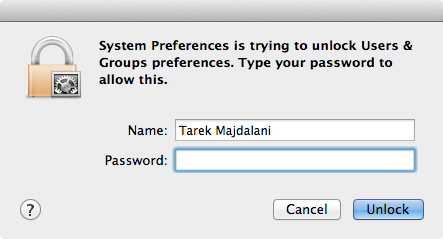
3. If the Add (+) button , which is used to add a new user account, is grayed, then we will have to click the lock icon to unlock it, and type an administrator name and password

Once the user name and password of an administrator account is typed, click the Unlock button.
4. Click the Add (+) button below the list of accounts![]()
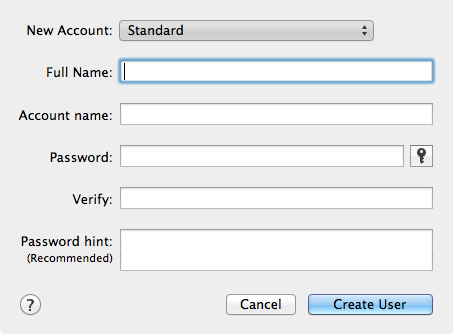
5. A new window will open where you will need to fill the details of the new account you want to create Choose a type of account from the New Account pop up menu
- Administrator: An administrator can create, delete, and modify accounts, install software, and change system settings.
- Standard: Standard users can install software for their own use and change settings related to their accounts, but can’t administer other user’s accounts.
- Managed with Parental Controls: For these accounts, the administrator can restrict access to applications and inappropriate content, and limit the amount of time users can use the computer.
- Sharing Only: Sharing-only users can access shared files remotely, but can’t log in or change settings on the computer.
- Group: A group account contains other user accounts and is used for setting privileges for shared files.
Note : There is another user type, which is the Root user, that you can not create because its already created. Its the “super user”, most powerful one, which I will discuss in a future article.
6. Type the full name of the user you want to create an account for.
7. An account name is generated automatically for user accounts. If you want to use a different account name, you can, but after the account is created, you can’t change the account name.
The account name is used to name the user’s home folder, and can be used as the login name.
8. Enter the account password in the Password and Verify fields, and then, if you want, enter a hint to help the user remember the password.
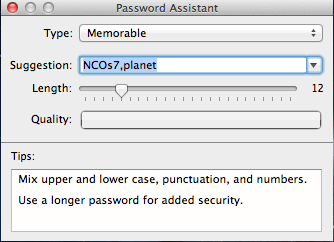
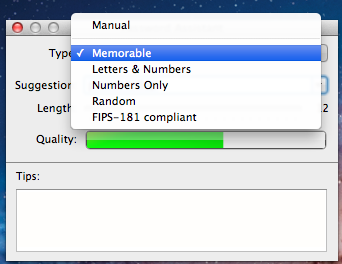
If you wish the system to generate for you a password, then click on the key button. ![]() Where you can set the type of password you want and the lenght of it.
Where you can set the type of password you want and the lenght of it.
9. Once everything is set, click Create Account. If automatic login is turned on, then you will be asked if you want to keep it on or turn it off. Make up your choice and click the appropriate button.
As a suggestion, creating different user account on a single machine, means this computer will be shared by different users, hence its better to turn off automatic login, so that whenever the system is restarted, the users are presented with the login screen , instead of automatically loggin on into the account who’s account was created first,or set to automatically login.

10. Once everything is set, click Create Account. If automatic login is turned on, then you will be asked if you want to keep it on or turn it off. Make up your choice and click the appropriate button.
As a suggestion, creating different user account on a single machine, means this computer will be shared by different users, hence its better to turn off automatic login, so that whenever the system is restarted, the users are presented with the login screen , instead of automatically loggin on into the account who’s account was created first,or set to automatically login.


