Close Menu
ElMajdal.netElMajdal.net
    ElMajdal.netElMajdal.net
    Contact Us
    • Home
    • Windows
      • Windows 11
      • Windows 10
      • Windows 8
      • Windows 7
    • Servers
      • Windows Server
      • Windows Server 2008
      • Exchange Server
    • MAC OS
    • ISA/TMG
    ElMajdal.netElMajdal.net
    Home»Windows 7»Changing Computer Name in Windows 7
    Windows 7

    Changing Computer Name in Windows 7

    2 Mins Read
    WhatsApp Facebook Twitter Telegram Reddit Email
    blank
    Share
    WhatsApp Facebook Twitter Telegram Reddit Email

    Introduction

    In this article I will be showing you were you can find your current computer name and how you can change it.

    By default, when you install Windows 7 and type your username at the time of installation, the computer name would be in this format : USERNAME-PC

    To change the computer name, log on with an administrator account and then follow the below steps :

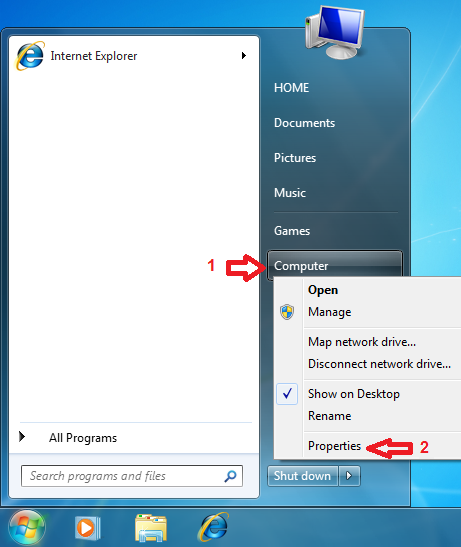
    1. Click the Start button right-click Computer, and then click Properties.
    2. The basic system information page will open, you will find the computer name, under the computer name, domain, and workgroup settings section. As you can see, the computer I’m currently working with has a computer name : HOME-PC
    3. To change the computer name, click on Change settings
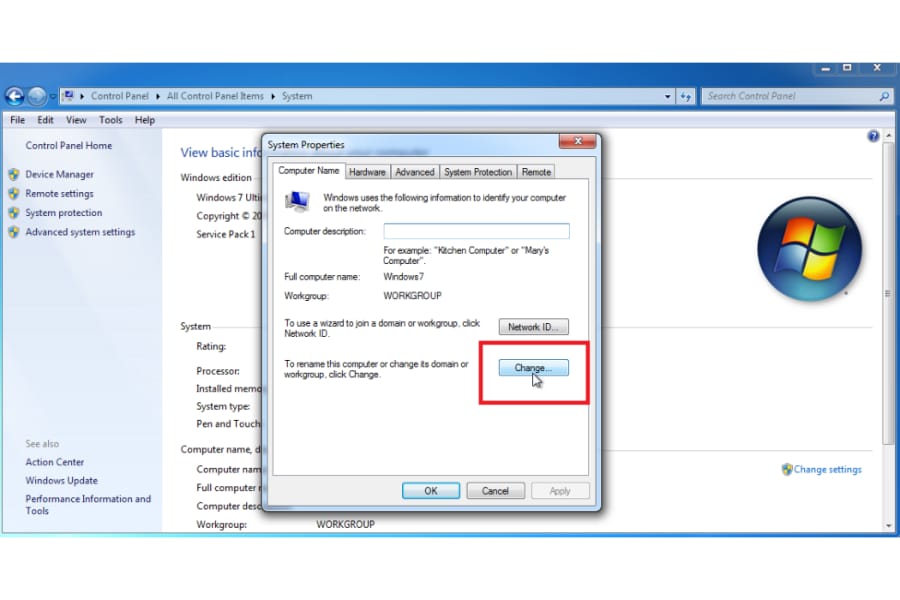
    4. The System Properties page will open, under the Computer Name tab, click on the Change button
    5. Inside the Computer Name textbox, you can find your current machine name.  To change it, type your new computer name and then click on OK
      Once you click OK, you will receive a dialog box informing you that the changes will not take effect till you restart your machine. Click OK
    6. You will be taken back to the System Properties page, with the note in the bottom of this page, reminding you to restart your computer so that changes take effect
      Once you click Close, a dialog box asking you to restart your machine will be displayed. Click Restart Now. If you don’t want to restart now, then click Restart Later.
      After your machine is rebooted, to confirm that your machine name was changed, go back to the basic system information page and check the computer name
    Share. WhatsApp Facebook Twitter Telegram Reddit Email
    Previous ArticleDownloading and Installing Internet Explorer 9
    Next Article Changing Windows 7 Shutdown Button

    Related Article

    Downloading And Installing Microsoft Edge on Windows 7

    View A List Of All Shared Folders On Windows

    Upgrading Windows 7 To Windows 8 Consumer Preview Build

    Latest Posts

    How To Enable Active Directory Recycle Bin On Windows Server

    How To Check The Health Of Your Laptop’s Battery In Windows

    How To Transfer FSMO Roles In Active Directory Using PowerShell

    How To Check Active Directory Forest And Domain Functional Level In Windows Server

    Advertisement

    For any Feedback, click on the Contact Us link

    Quick Links
    • Contact Us
    • Windows 11
    • Windows 8
    • Windows 10
    • Windows 7
    • Windows Server
    • Windows Server 2008
    • Exchange Server
    • macOS
    • ISA Server
    • Privacy Policy
    • Contact Us
    • Windows 11
    • Windows 8
    • Windows 10
    • Windows 7
    • Windows Server
    • Windows Server 2008
    • Exchange Server
    • macOS
    • ISA Server
    • Privacy Policy
    © ElMajdal 2007-2026

    Type above and press Enter to search. Press Esc to cancel.