Close Menu
ElMajdal.netElMajdal.net
    Facebook X (Twitter) Instagram YouTube
    Facebook X (Twitter) Instagram YouTube
    ElMajdal.netElMajdal.net
    Contact Us
    • Home
    • Windows
      • Windows 11
      • Windows 10
      • Windows 8
      • Windows 7
    • Servers
      • Windows Server
      • Windows Server 2008
      • Exchange Server
    • MAC OS
    • ISA/TMG
    • About Tarek
    ElMajdal.netElMajdal.net
    Home » How to Encrypt an External Drive Quickly in Mac OS X Mountain Lion 10.8
    macOS

    How to Encrypt an External Drive Quickly in Mac OS X Mountain Lion 10.8

    TarekBy Tarek3 Mins Read
    WhatsApp Facebook Twitter Telegram Reddit Email
    blank
    Share
    WhatsApp Facebook Twitter Telegram Reddit Email

    Introduction

    Protecting your External USB thumb or hard disk is an important step, specially if you save on them vital or personal files, and you don’t wish anyone to have access to these files if the disk was lost or stolen. In this articles I will be showing you to to Encrypt an External USB disk with Mountain Lion 10.8


    With previous versions of of OS X , we were used to encrypt the drive by using the Disk Utility. However, with OS X Mountain Lion, the procedure can be done directly on the mounted drive, either from the Desktop or Finder.

    1. Connect your External Hard disk, SD card, or USB disk to your MAC machine

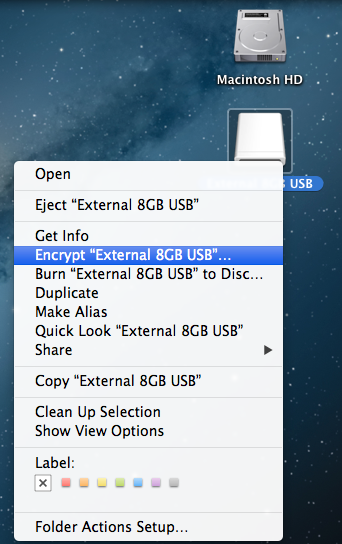
    2. From the Desktop or Finder, right click on the External Disk and click on “Encrypt DiskName“… , where DiskName is the name of the External drive, in my case, my USB disk is named : External 8GB USB   

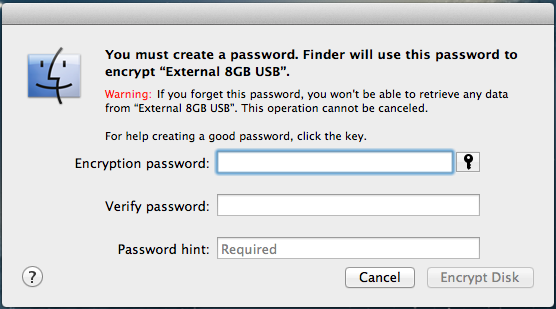
    3. You will be asked to type a password and confirm it. Also you are required to Type a password hint.

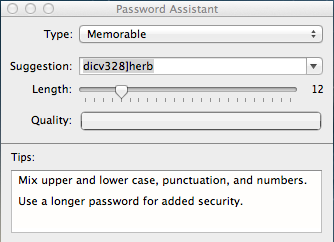
    4. If you want any help in choosing a complex password, then click on the Key icon , and the Password Assistant will launch. Where you can specify the type and length of the suggested password

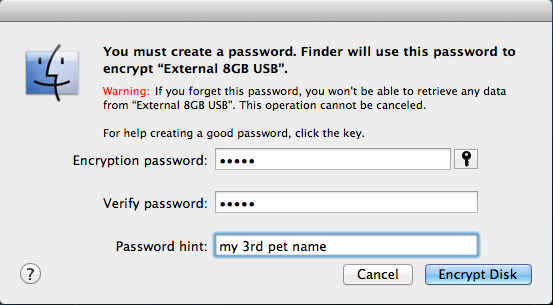
    5. Once the password is set by typing it or by selecting a suggested password generated by the Password Assistant and a password hint is typed as well, Click on Encrypt Disk

    6. Encrypting your disk drive will start, You can verify this by right clicking on the External disk and you will notice the the Encrypt “DiskName”… is now replaced with Encrypting “DiskName”…

    7. The process of encrypting the disk takes quite a long time depending on the disk size. Once the External disk is encrypted, it will disappear from your desktop and be mounted again. In this stage, your disk is now encrypted, to verify this, eject the disk and connect it again to your machine.

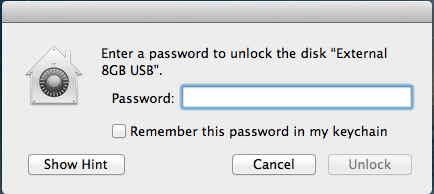
    8. The next time you connect your External disk into your machine, before the device get mounted, you will be asked to enter the encryption password so that you are granted access to the external disk .

    If you forgot your password, you can click on the Show Hint button, so that you get a hint for your password

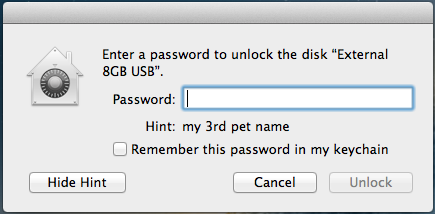
    9. Type your password and then click on the Unlock button. Congratulations, now your external disk is secured.

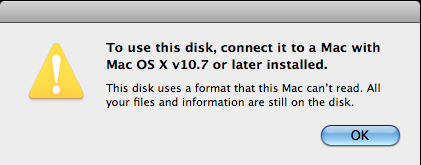
    Note : Encrypting your External Disk on OS X Mountain Lion will only make it work and mounted on OS X Lion and OS X Mountain Lion. Trying to connect the encrypted disk to OS X Snow Leopard generated the below error message.

    Summary

    Encrypting your External Disk drive or USB thumb is a must to do procedure if you have files/photos on the disk drive and you don’t wish anyone to have access to the drive in case it was stolen or lost. Its and easy process and a best practice process to secure your data.

    Share. WhatsApp Facebook Twitter Telegram Reddit Email
    Previous ArticleHow to Enable and Use Twitter Integration in OS X Mountain Lion
    Next Article How To Set Up Facebook Integration on Your Mac with OS X Mountain Lion
    Tarek
    • Website
    • Facebook
    • X (Twitter)
    • Instagram

    Tarek Majdalani is an accomplished Windows Expert-IT Pro MVP, honored by Microsoft for eight consecutive years from 2007-2015. Holding a B.E. in Computer Engineering from the Lebanese American University, he pursued further education while working, earning various certificates showcased in his MVP profile. Tarek is currently serving as the Director of Engineering & Technology at Alrai Media Group in Kuwait. Since 2006, he has been actively contributing to the community by writing tutorials featuring tips and tricks, amassing over 300 tutorials on diverse systems.

    Related Article

    How To Download And Install macOS Sonoma

    How to Find the Serial Number of Your Apple Computer

    How To Set Your Own Images as a Folder Icon in Mac OSX

    Leave A Reply Cancel Reply

    Latest Posts

    How To Enable Active Directory Recycle Bin On Windows Server

    How To Check The Health Of Your Laptop’s Battery In Windows

    How To Transfer FSMO Roles In Active Directory Using PowerShell

    How To Check Active Directory Forest And Domain Functional Level In Windows Server

    Advertisement

    For any Feedback, click on the Contact Us link

    Facebook X (Twitter) Instagram YouTube
    Quick Links
    • Contact Us
    • About Tarek
    • Windows 11
    • Windows 8
    • Windows 10
    • Windows 7
    • Windows Server
    • Windows Server 2008
    • Exchange Server
    • macOS
    • ISA Server
    • Privacy Policy
    Visitors
    • Contact Us
    • About Tarek
    • Windows 11
    • Windows 8
    • Windows 10
    • Windows 7
    • Windows Server
    • Windows Server 2008
    • Exchange Server
    • macOS
    • ISA Server
    • Privacy Policy
    © ElMajdal 2007-2025

    Type above and press Enter to search. Press Esc to cancel.

    ×