


Introduction
In this article I will show you how to publish a server that has ULTRA VNC installed on it so that you can remotely control this server from External Networks using ULTRA VNC. You can download ULTRA VNC which is a free software than can be downloaded from here
You can remotely control machines behind ISA server with VNC using either of these two methods:
1 – With VNC Viewer , using inbound TCP port 5900
2 – With any web browser, using inbound TCP port 5800
Configuration on ISA Server
We will start with creating a publishing rule for the VNC Viewer
1. Open ISA Management Console
2. Right click Firewall Policy and click on New , then click on Non-Web Server Protocol Publishing Rule

This also can be done from the Right Pane, under the Tasks bar :

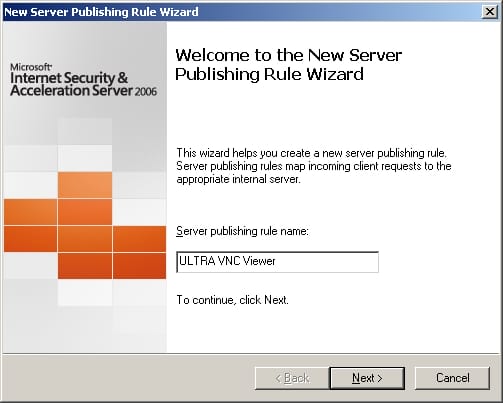
3. The New Server Publishing Rule Wizard will be launched, give a name to your new rule , in this article we will name it ULTRA VNC Viewer, then click Next
4. Enter the IP Address of the server you want to publish, , then click Next. If you do not know the IP address of the server, then click on Browse to get the IP address of the server using its name.

5. Now we need to enter the protocol used by the published server, click on the New Button

6. Enter a name for the protocol we want to create. I want to create the VNC Viewer protocol, so I will name it VNC Viewer

7. Click on the New Button

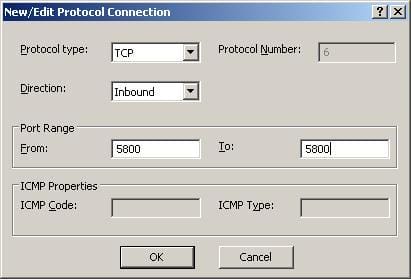
8. Select the following:Protocol Type : TCP Direction : Inbound Port Range : From 5900 To 5900 as shownThen click on OK


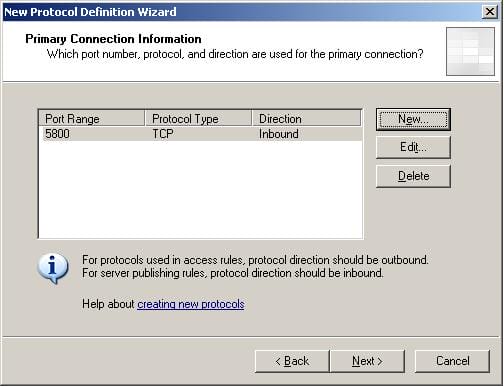
The protocol we just created will be displayed, Click Next
9. We will not create any Secondary Connections, so ignore this page and click on Next

10. The Completing the New Protocol Definition Wizard page will be displayed now, review it and then click on Finish

11. After finishing creating the protocol, we will go back to the Select Protocol page, click on Next

12. We need to specify the Network Listener IP Address, choose External, then click on Address

Select Specified IP address on the ISA Server computer in the selected network, and under the Available IP Address , select the IP address of ISA server Public IP, Click on Add and then click on OK. Then click Next

13. Review the Publishing rule you have just created and then click on Finish
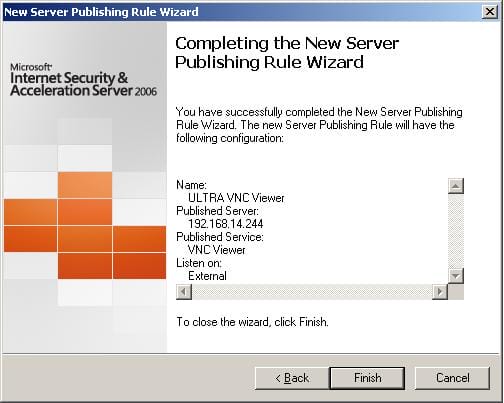
14. The rule we created will look like this :

Now I will start creating a publishing rule for controlling VNC server using any web browser.
15. Right click Firewall Policy and click on New , then click on Non-Web Server Protocol Publishing Rule
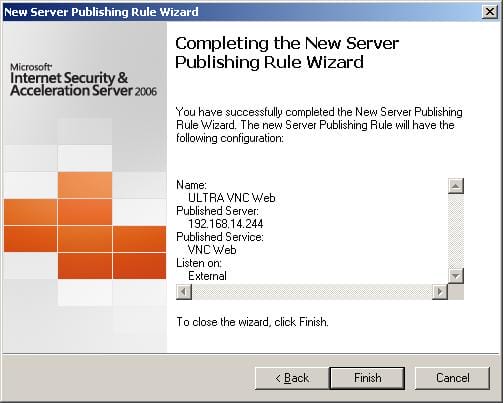
16. The New Server Publishing Rule Wizard will be launched, give a name to your new rule , in this article we will name it ULTRA VNC Web, then click Next

17. Enter the IP Address of the server you want to publish, , then click Next.

18. Now we need to create a new TCP Inbound protocol , click on the New Button

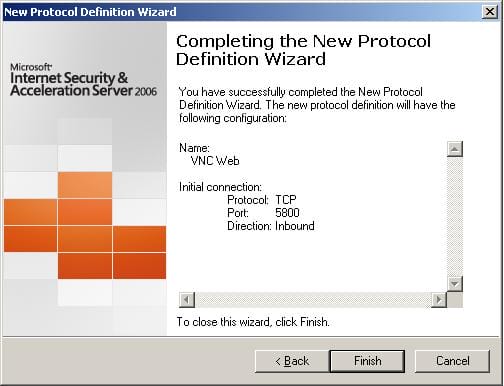
19. Name the protocol VNC Web. Click Next

20. Click on the New Button

21. Select the following:Protocol Type : TCP
Direction : Inbound Port Range : From 5800 To 5800 as shown Then click on OK
The protocol we just created will be displayed, Click Next
22. We will not create any Secondary Connections, so ignore this page and click on Next

23. The Completing the New Protocol Definition Wizard page will be displayed now, review it and then click on Finish
24. After finishing creating the protocol, we will go back to the Select Protocol page, click on Next

25. We need to specify the Network Listener IP Address, choose External, then click on Address

Select Specified IP address on the ISA Server computer in the selected network, and under the Available IP Address , select the IP address of ISA server Public IP, Click on Add and then click on OK. Then click Next

26. Review the Publishing rule you have just created and then click on Finish
27. The rules we created will look like this :

Now its time to connect using the VNC Viewer and will also try using Internet Explorer 7 .
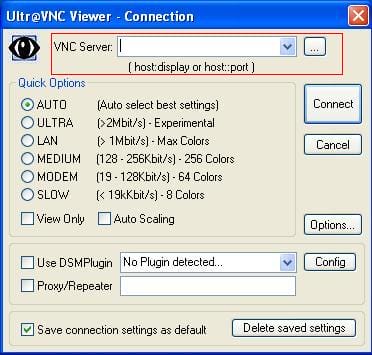
28. Install the VNC Viewer on any client machine and open it. Enter the Your domain name or Public IP, and click on ConnectYou will get an authentication box to enter the password you have configured on the VNC Server. Once your enter this password, you will start having remote control of the server.

29. The second method is by using any web browser, I will be using IE7, all you need to do is enter the following URL: http://DomainName:5800 OR http://PublicIP:5800

You will also have a textbox to enter the password you configured on the VNC Server.
One last note, set ULTRA VNC Server that you are publishing as SecureNet Client, this is done by setting its Default Gateway to be ISA Server Internal IP
Summary
In this article, we learned how to publish a server behind ISA server to remotely control it using ULTRA VNC.
You can use VNC in two methods, either using the VNC Viewer or by using any web browser.