
Windows 11 showing low disk space? Deleting random files is risky. The better solution is to identify what occupies the drive, review safe cleanup recommendations, and remove only items you recognize. This tutorial walks through Windows 11 tools and a read-only PowerShell method for locating large personal files.
At a glance: Start with Settings → System → Storage. Inspect each usage category and Cleanup recommendations, then check applications and personal folders. Avoid deleting unknown system files or manually clearing Windows directories.
Before you start: protect your files
Save important work and confirm backups are current. In particular, do not manually delete files from C:\Windows, Program Files, recovery partitions, or unfamiliar AppData folders. Deleting files inside OneDrive-synced folders can remove them from the cloud and other devices. Use Windows cleanup tools rather than manually deleting system content.
Step 1. Check how much space is left
Press Windows + E, select This PC in File Explorer, and locate Local Disk (C:). Note the available space. If the bar is nearly full, proceed to the breakdown below.
| File Explorer drive inspection — instructional diagram (not a screenshot) | |
|---|---|
| File Explorer | This PC |
| Devices and drives | Local Disk (C:) |
| Record | Free space and total capacity |
Step 2. Open the Windows 11 Storage dashboard

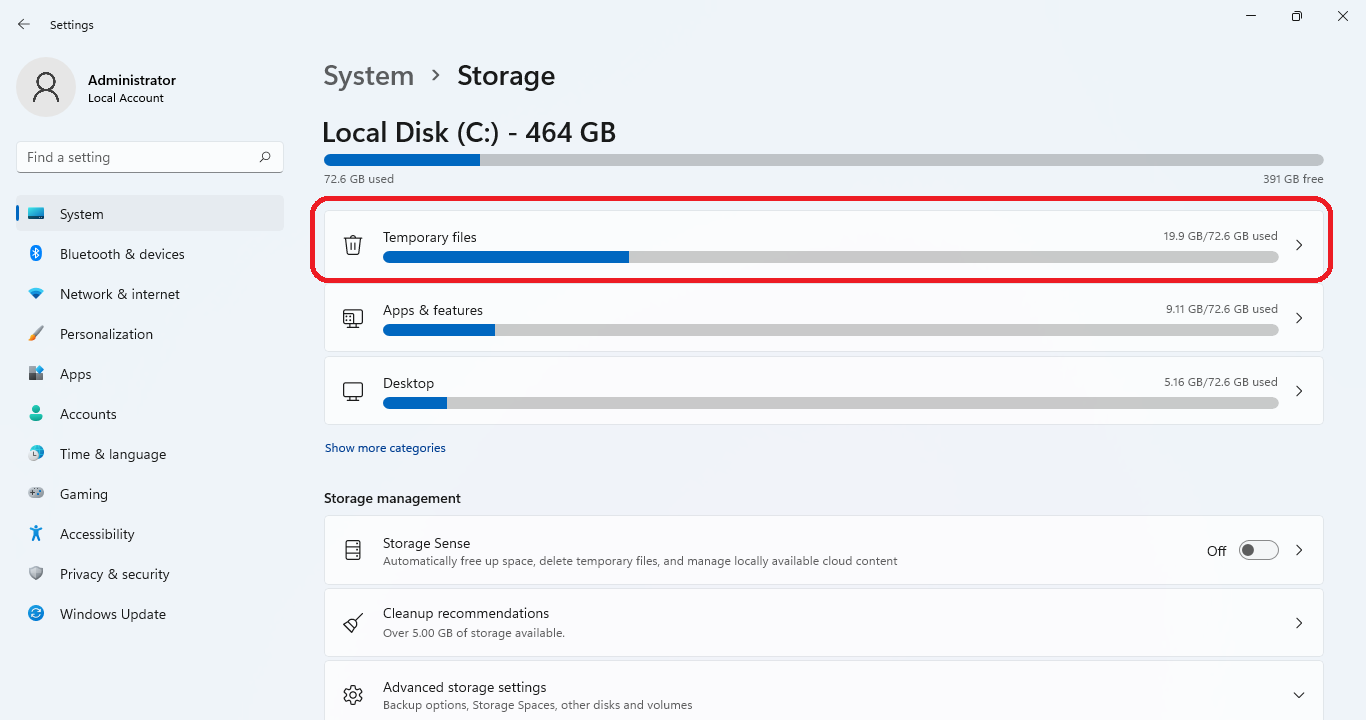
Press Windows + I, choose System, then Storage. Windows calculates storage usage on your system drive, including installed apps, temporary files, and other categories. Allow the analysis to finish. Select a category to investigate; do not assume every category can be emptied safely.
| Storage navigation — instructional diagram (not a screenshot) | |
|---|---|
| 1 | Settings |
| 2 | System |
| 3 | Storage |
| 4 | Review disk usage categories |
Step 3. Review Cleanup recommendations
Under Storage, open Cleanup recommendations. Microsoft groups potential cleanup items under sections such as Temporary files, Large or unused files, Files synced to the cloud, and Unused apps. Review each suggested item individually. Select only files you know you do not need, then use that section’s Clean up action.
Warning: If Previous Windows installation(s) appears, removing it can prevent rolling back to your earlier Windows version. Downloads and Recycle Bin content may include personal files. Inspect carefully before cleaning.
| Cleanup recommendations — instructional diagram (not a screenshot) | |
|---|---|
| Temporary files | Review rather than selecting everything |
| Large or unused files | Inspect file name, location and importance |
| Files synced to cloud | Check sync completion and offline needs |
| Unused apps | Uninstall through supported app controls |
Step 4. Identify unusually large personal files
Check Downloads, Videos, Documents, and Desktop. In File Explorer, switch to Details view and sort by Size when supported. Note that folder sizes are not calculated in the standard Size column: open suspected folders and investigate their contents instead.
Large installation ISO images, exported videos, archives, and old backups are common candidates. Open or preview files before removing them, and move anything important to verified external storage rather than deleting it.
Step 5. Find large files with PowerShell (read-only)
For a more systematic search, open Windows PowerShell or Terminal. The command below inspects only your Downloads folder, outputs the 20 largest files, and does not delete anything.
$path = Join-Path $HOME 'Downloads'
Get-ChildItem -LiteralPath $path -File -Recurse -ErrorAction SilentlyContinue |
    Sort-Object Length -Descending |
    Select-Object -First 20 FullName,
        @{Name='SizeGB';Expression={[math]::Round($_.Length / 1GB, 2)}}
If your Downloads folder was redirected to a different location, change $path to the actual folder first. Large directory trees can take time to scan. -ErrorAction SilentlyContinue skips inaccessible items, so this list might not include every file. Search your own data folders, not entire protected system directories.
| How to read PowerShell output — instructional diagram (not a screenshot) | |
|---|---|
| FullName | File’s full path—confirm it is personal data |
| SizeGB | Approximate file size in gigabytes |
| First 20 | The twenty largest accessible files under the chosen folder |
| Safety | Read-only command; deletion is a separate manual decision |
Step 6. Check large installed apps
Open Settings → Apps → Installed apps. Where available, use the size sorting option to locate large applications. App size estimates can be incomplete. Uninstall unneeded applications from this Settings page, using the application’s uninstaller when necessary—do not delete its folder from Program Files.
Step 7. Use Storage Sense for ongoing maintenance
Return to Settings → System → Storage → Storage Sense. Configure temporary-file cleanup and its schedule. Review Recycle Bin, Downloads, and cloud-content settings: automatic cleanup can remove old items depending on your selections. Microsoft says Storage Sense primarily operates on the system drive. Choose conservative settings and understand the consequences before enabling automatic deletion of personal items.
Step 8. Consider Disk Cleanup for supported system files
Search for Disk Cleanup in Start, launch it, and choose the system drive. Review file types and descriptions. To review eligible system files, choose Clean up system files. Do not select previous Windows installations if you may need to roll back an upgrade.
Step 9. Verify the space recovered
Open This PC again and compare free space with the number you wrote down in Step 1. If space still disappears rapidly, review downloads, recently installed software, virtualization images, and backup behavior. A suddenly expanding file may indicate a malfunctioning application and should be investigated rather than deleted blindly.
Common questions and troubleshooting
Why does the Storage screen show a different value from File Explorer?
Windows categorizes data differently across screens, and usage measurements can update asynchronously. File Explorer reports overall drive availability; Storage offers a category-level estimate.
Can I delete everything under Temporary files?
No. Read the individual descriptions and check for Downloads, rollback files, and other personal or recoverable content before confirming cleanup.
Will uninstalling unused apps delete my documents?
Normally app uninstallers remove program components, but app-specific data or settings may also be affected. Back up important projects and check the app’s own guidance first.
What if disk space is still low?
Consider moving verified backups or media archives to a larger drive, checking local virtual-machine disks, and reviewing whether your storage needs exceed the capacity of the drive. Do not use destructive third-party cleaners to remove unknown files.
Related ElMajdal.net guides
For other performance improvements, see How to Disable Startup Apps in Windows 11. If storage issues affect synchronized folders, see How to Fix OneDrive Not Syncing. For recovery planning, read How to Create and Use System Restore Points.
Official sources and image credit
- Microsoft: Free up drive space in Windows
- Microsoft: Storage settings in Windows
- Microsoft: Manage drive space with Storage Sense
The diagrams in this tutorial are original instructional navigation tables, not genuine Windows screenshots. Featured photograph: Art Wall / Unsplash.