Close Menu
ElMajdal.netElMajdal.net
    ElMajdal.netElMajdal.net
    Contact Us
    • Home
    • Windows
      • Windows 11
      • Windows 10
      • Windows 8
      • Windows 7
    • Servers
      • Windows Server
      • Windows Server 2008
      • Exchange Server
    • MAC OS
    • ISA/TMG
    ElMajdal.netElMajdal.net
    Home » How To Limit The Bandwidth Used By Windows Update In Windows 10
    Windows 10

    How To Limit The Bandwidth Used By Windows Update In Windows 10

    2 Mins Read
    WhatsApp Facebook Twitter Telegram Reddit Email
    blank
    Share
    WhatsApp Facebook Twitter Telegram Reddit Email

    Introduction

    While installing new updates via Windows Update or the Microsoft Store, we often experienced slow internet speed. Its because Windows 10 consume all of the available internet bandwidth.

    Starting with the Windows 10 Fall Creators Update (version 1709), Microsoft is addressing this issue by introducing new options that allow you to limit the bandwidth your device uses to download and upload updates. The new feature can allow you to specify how much Internet bandwidth these update processes can use so that it does not affect other programs.

    If you want to minimize your internet connection impact during updates, you can use the new Delivery Optimization options to limit the bandwidth usage on your device.

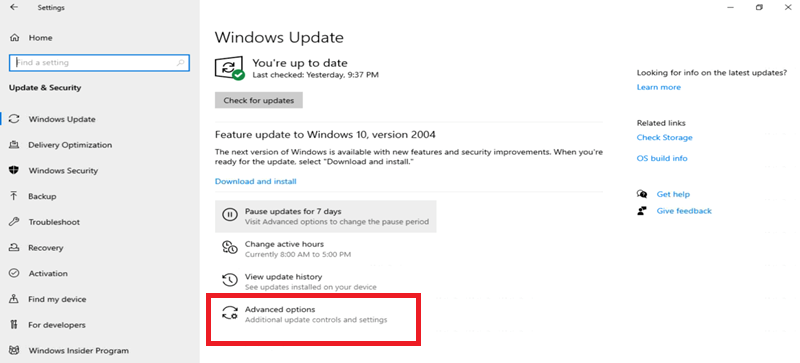
    1.  Click the Start button and then click on Settings

    2.  Click on Update & Security

    3.  Click Advanced options

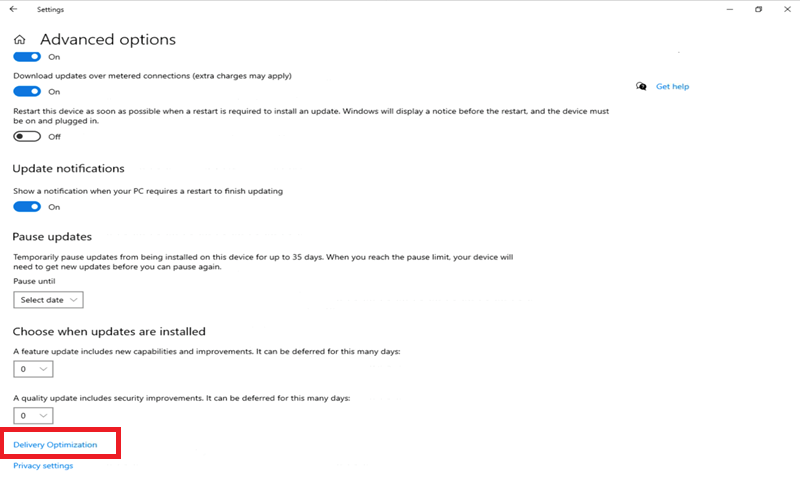
    4.  On Advanced options, click the Delivery Optimization

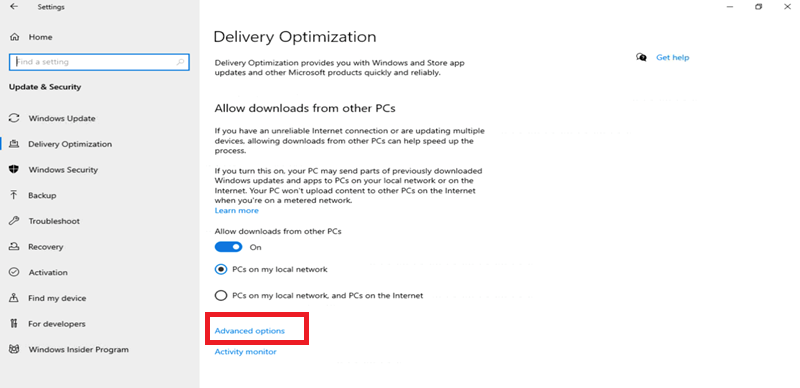
    5.  On Delivery Optimization, click the Advanced options

    6. Under “Download settings,” check the Limit how much bandwidth is used for downloading updates in the background option.
    Use the slider to specify (in percentage) the amount of bandwidth you want your device to use.

    Under “Upload settings,” check the Limit how much bandwidth is used for uploading updates to other PCs on the Internet option.
    Use the slider to set (in percentage) the amount of bandwidth you want to dedicate for uploads.
    If you want to limit the amount of data your device uploads per month, you can also check the Monthly upload limit option.
    Use the slider to set the upload limit in gigabytes.

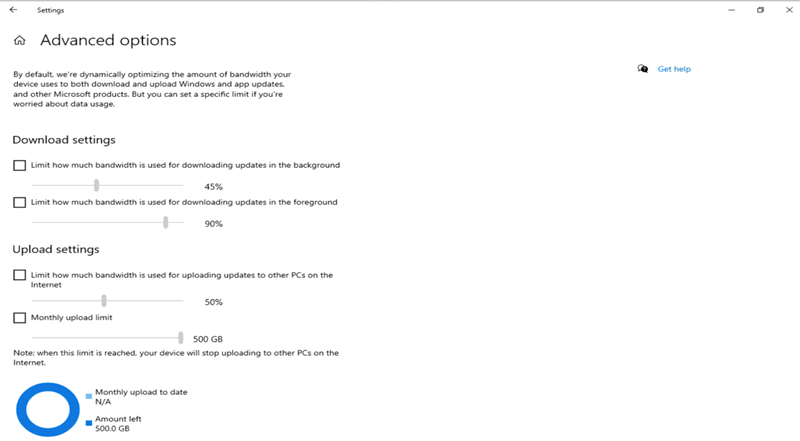
    It should be noted that the upload settings will only work if you have the “Deliver Optimization” settings configured to Allow downloads from other PCs using the PCs on my local network, and PCs on the Internet option. However, if you’re looking to minimize the data speed usage, you should be using the PCs on my local network option instead.

    Share. WhatsApp Facebook Twitter Telegram Reddit Email
    Previous ArticleJoining Windows 10 To Active Directory Domain
    Next Article Installing Windows 10 Feature Update Version 2004

    Related Article

    How To Fix The Microsoft Print To PDF Feature Not Working In Windows 10

    How To Find The MAC/Physical Address In A Windows 10 Computer

    How To Protect Your PC From Ransomware Using Windows Security

    Latest Posts

    How To Enable Active Directory Recycle Bin On Windows Server

    How To Check The Health Of Your Laptop’s Battery In Windows

    How To Transfer FSMO Roles In Active Directory Using PowerShell

    How To Check Active Directory Forest And Domain Functional Level In Windows Server

    Advertisement

    For any Feedback, click on the Contact Us link

    Quick Links
    • Contact Us
    • Windows 11
    • Windows 8
    • Windows 10
    • Windows 7
    • Windows Server
    • Windows Server 2008
    • Exchange Server
    • macOS
    • ISA Server
    • Privacy Policy
    • Contact Us
    • Windows 11
    • Windows 8
    • Windows 10
    • Windows 7
    • Windows Server
    • Windows Server 2008
    • Exchange Server
    • macOS
    • ISA Server
    • Privacy Policy
    © ElMajdal 2007-2025

    Type above and press Enter to search. Press Esc to cancel.