


Introduction
These days almost every corporate has different operating systems installed in its Network, such as Windows, Unix /Linux , Macintosh etc..
As an ISA Server administrator, you should know how to configure each of the different operating systems to be able to communicate with ISA Server and which of the different ISA Server clients is supported on each of the different operating systems. In this article, I’m going to show you how to configure Macintosh machines so that they can have Internet access through ISA Server, either as Web Proxy client or SecureNet client.
ISA Server has three client types:
- Firewall Client
- Web Proxy Client
- SecureNet client
Usually with Windows machines, they can be set as any client type or even all of the above. But what about non Windows clients, such as Unix/Linux or Apple Macintosh ( will be called as MAC in this article ) machines ? Well, Non Windows Machines can be set only as Web Proxy Client and/or SecureNet Client. They can not be set as Firewall Client, as the Firewall client software is an executable file that can not be installed on non Windows machines.
If you do not require to force authentication for your MAC machines, then simply set these machines as SecureNet clients. If you do require authentication, that is to ask your users to provide username/password to be granted outbound connection, then set these machines as Web Proxy Clients.
I will deal with every case separately and from scratch, so that if you wish to follow one method, you are completely independent of the other.
- Setting the Macintosh machines as Web Proxy clients
- Configurations On ISA Server for Web Proxy Clients
- Setting the Macintosh machines as SecureNet clients
- Configurations On ISA Server for SecureNet Clients
Setting the Macintosh Machines as Web proxy Clients
If you do require to force authentication for outbound connections, then set the MAC machines as Web Proxy Client by following the below steps :
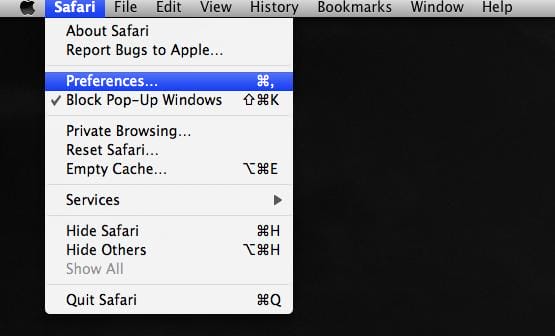
1. Open Safari Web browser, and then from the menu bar, click on Safari > Preferences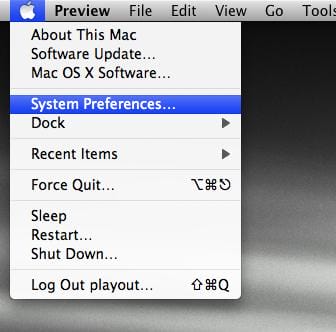
2. On the General page, click on the Advanced icon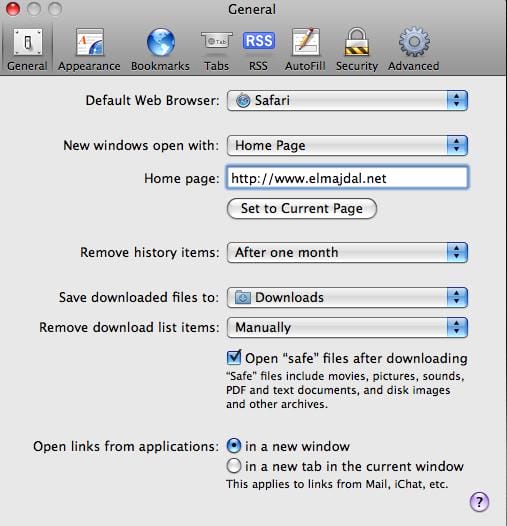
3. Then click on Change Settings button beside Proxies
4. Under Select a protocol to configure, Select the check box beside the Web Proxy (HTTP), then enter the Internal IP of ISA Server and the port number under Web Proxy Server
That is all what you have to do on the Apple Macintosh machine to be set as a Web Proxy client.
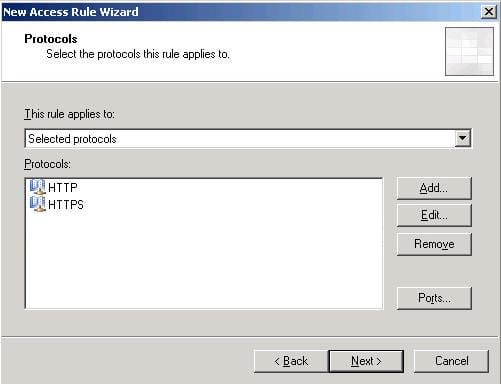
Now on ISA Server, we will create a general rule to allow all the Internal Network users to have Internet Access by creating the following rule :
Allow > HTTP/HTTPS > From Internal > To External > Domain Users AD Group
Configurations on ISA Server for Web Proxy Clients

To create the new rule, right click on the Firewall Policy node from the left pane, click on New and then on Access Rule

Give a descriptive name to the rules and then click on Next

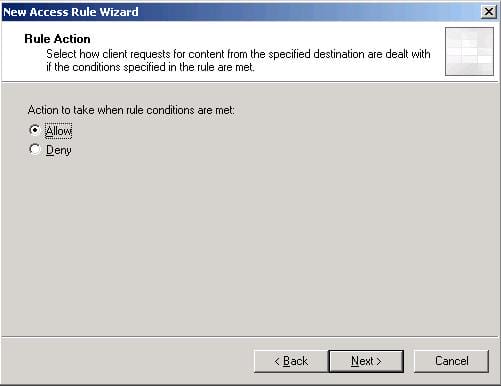
On the Rule Action page, select Allow and then click on Next
On the Protocols page, click on the Add button, the Add Protocols page will open, expand the Common Protocols folder, and choose the protocol you want to add and then click the Add button, once done, click on the Close button.
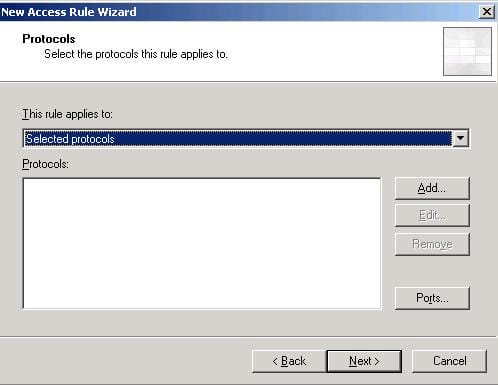
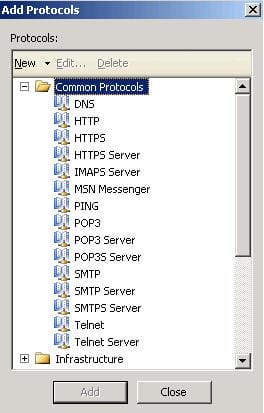
The selected protocols will be displayed, if you need to add other protocols, click the Add button again and start adding the required protocols, once done, click Next
On the Access Rule Sources page, click on the Add button and from the Add Network Entities page, expand the Networks folder, and click on Internal and then press the Add button, then close the Add network Entities page by clicking on the Close button, then on the Access Rules Sources page, click Next

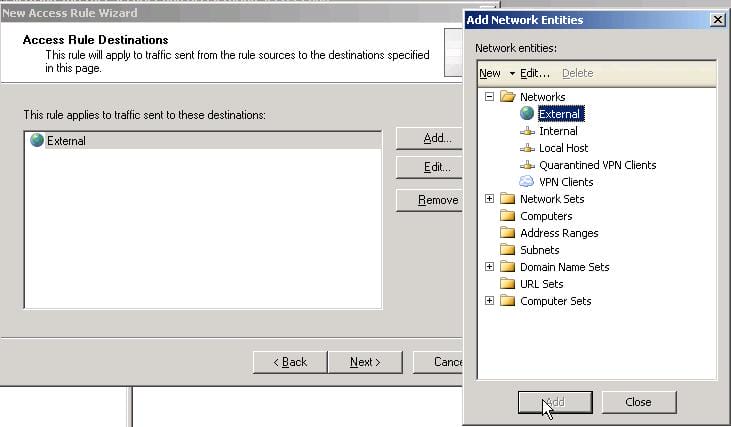
On the Access Rule Destination page, click on the Add button and from the Add Network Entities page, expand the Networks folder, and click on External and then press the Add button, then close the Add network Entities page by clicking on the Close button, then on the Access Rules Destination page, click Next
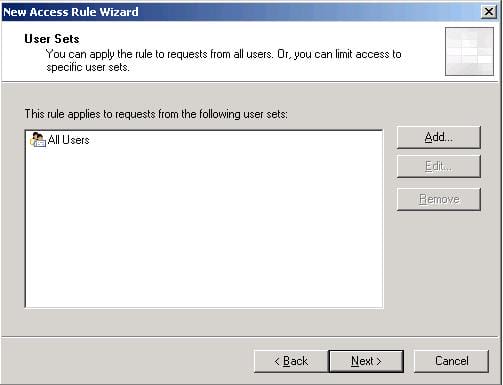
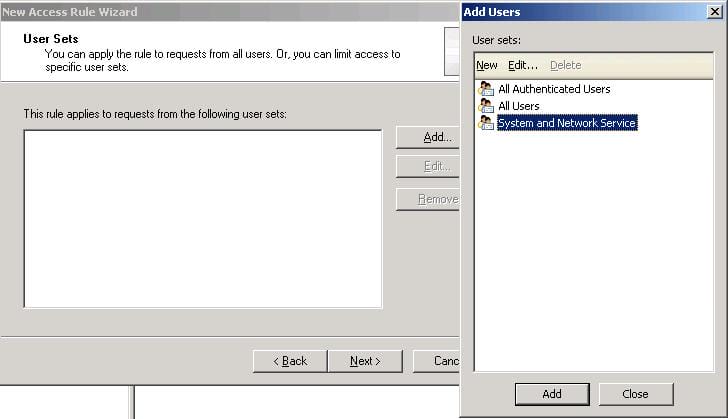
On the User Sets page, click on the All Users group and then press the Remove button. The All Users Group represents both Anonymous and Authenticated users, but as we only need to allow outbound connection for authenticated users, then you can either add the All Authenticated Users Group, or to add a custom user/group from Active Directory for example, then click on the Add button
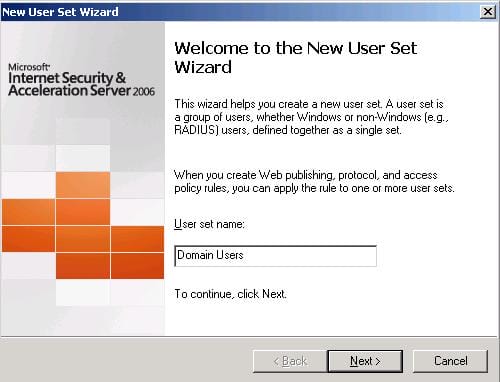
From the Add Users page, click on New
Enter a descriptive name for the user/group you want to create then click Next
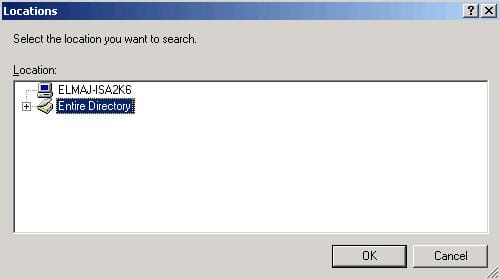
On the Users page, click on Add > then click on Windows users and groups ( I will choose my users/groups from Active Directory ). On the Select users and Groups page, make sure that the Entire Directory is displayed and not the Local machine name, this can be done by clicking on the Locations button and selecting the Entire Directory
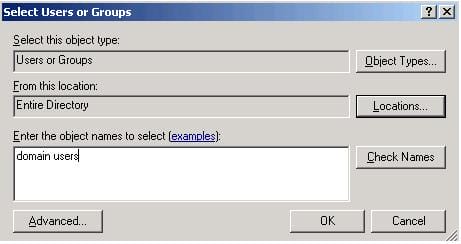
Type the name of the user/group and then click on the OK button ( if you are not sure if you have written the name correctly , you can press the Check Names button )
The group name will be displayed inside ISA Server, click on Next to go to the review page, and then click on Finish
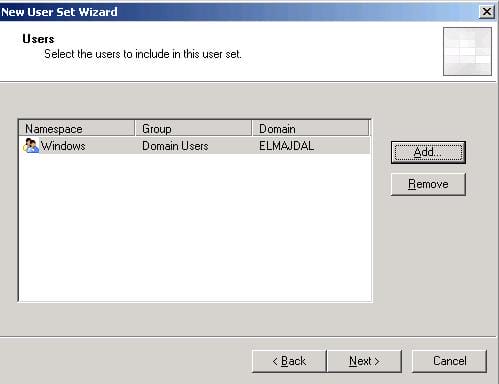
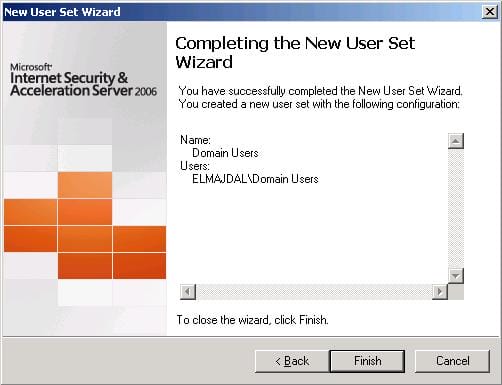
Once the Finish button is pressed, as you see the Domain Users group is now available inside the Add Users page, click on it and then click on the Add button to add the Domain users group to the rule we are creating. Click the Close button to close the Add Users page, then on the Users Sets page click on Next

Review the rule you have created, and then click on Finish

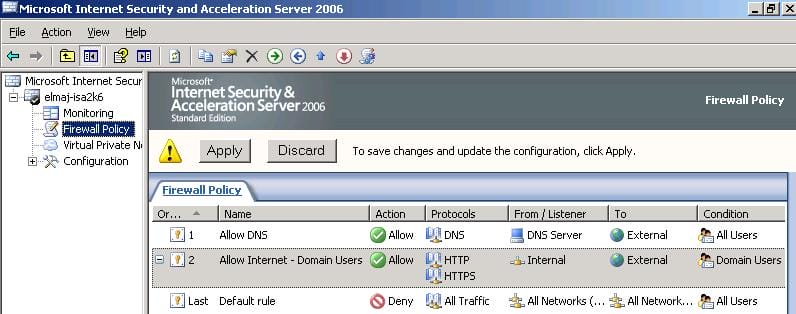
The Allow Internet – Domain Users rules will be displayed, click on the Apply button so that changes take effect. now go to your Web proxy Macintosh machines and try to surf the Internet. they will be request to enter a username and password from Active Directory, enter them as follows:
DomainName\username
Password
Setting the Macintosh machines as SecureNet clients
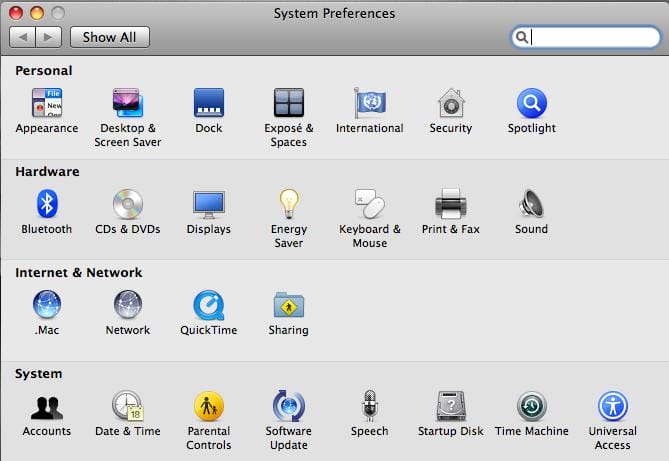
From the top menu Bar, click on Apple Icon then click on System Preferences…

or you can directly open the System Preferences by clicking on its icon in the Dock.
 The System Preferences will open, under Internet & Network, click on Network
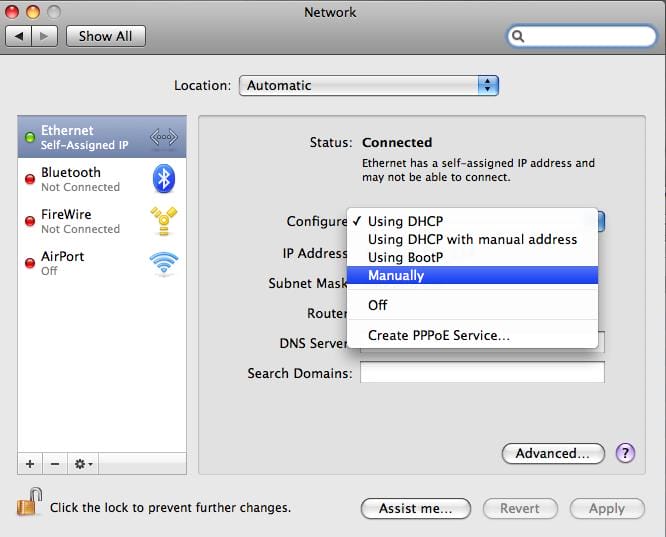
On the Network Page, click on Ethernet from the left pane. If you have a DHCP Server in your Network, then choose Using DHCP, else if you want to assign a Static IP Address to your Mac machines, then select Manually from the Configure list.
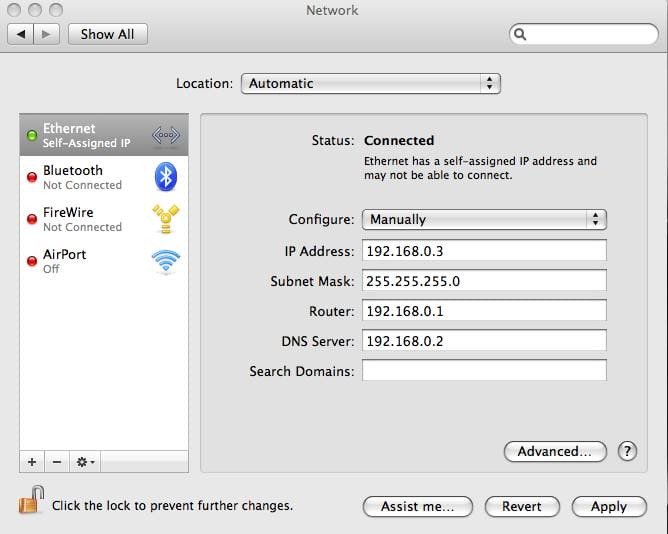
Enter the IP address, Subnet Mask. The Router is the default gateway , which in simple network ( single subnet ) it should be set as the Internal IP Address of ISA Server, so if your ISA Server Internal Network Card IP Address is 192.168.0.1, then the Router on this page should be set as 192.168.0.1. The last entry is for your Internal DNS Server which should forward requests to your ISP DNS Servers. Check my article Internal DNS Forwarding Through ISA Server 2004/2006 for more details. Click Apply.
With these steps, we have finished configuring the MAC machine as a SecureNet client.
Configurations On ISA Server for SecureNet Clients
SecureNet clients can not authenticate, so we must create an outbound rule with the condition All Users.
a sample rule would look like this:
Allow > Protocols > From Selected Computer List > To External > All Users
To create such rule, follow these steps :
Open ISA Server Management Console, Click on Start > All Programs > Microsoft ISA Server > ISA Server Management

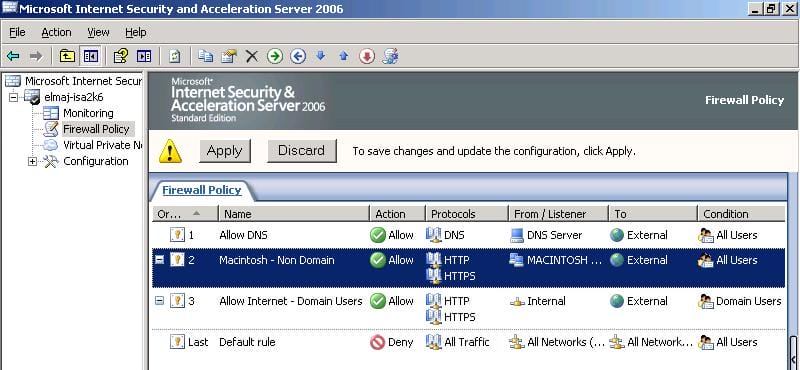
As you can see, I only have three rules. One for the DNS server to communicate with the ISP DNS Servers, rule # 2 to allow outbound internet access for Domain Users and the 3rd rule is the default deny rules. We need to create a rule for the Macintosh SecureNet clients.
To create the rule, right click on Firewall Policy node from the left pane, click on New > then click on Access Rule

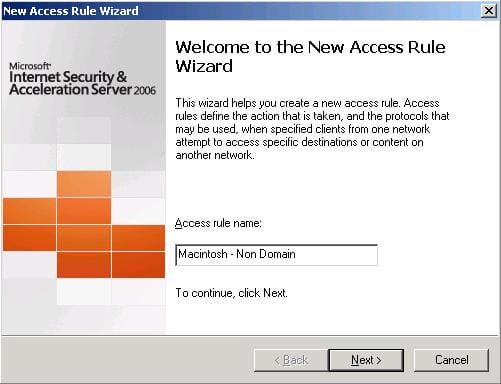
On the Welcome to the New Access Rule Wizard page, Enter a descriptive name for the access rule, then click Next
On the Rule Action page, select Allow, then click Next
On the Protocols page, click on the Add button, the Add Protocols page will open, expand the Common Protocols folder, and choose the protocol you want to add and then click the Add button, once done, click on the Close button.


The selected protocols will be displayed, if you need to add other protocols, click the Add button again and start adding the required protocols, once done, click Next
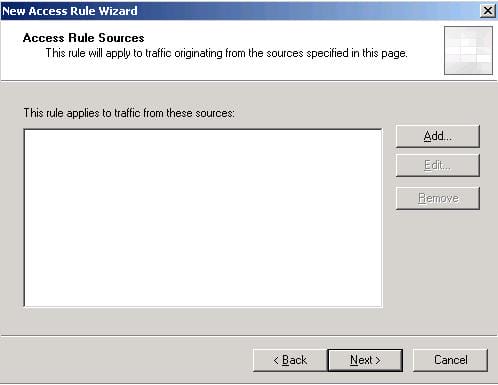
On the Access Rule Sources page, we need to create a Computer Object/Set to include the IP(s) of our Apple Macintosh machine(s), click on the Add button, click on Computer Set so that we can include in it multiple IPs for different machines
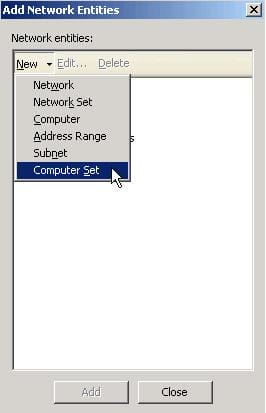
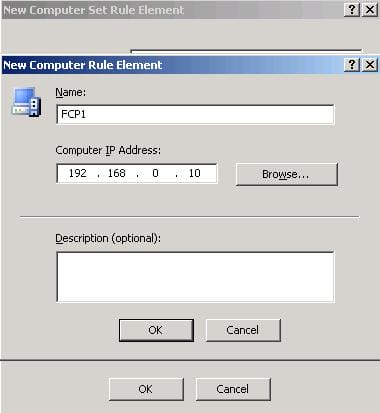
Enter a name for the new Computer Set, click on the Add button, then click on Computer, enter the name of the Mac machine, the IP Address and then click on OK, repeat these steps for every machine you want to add.
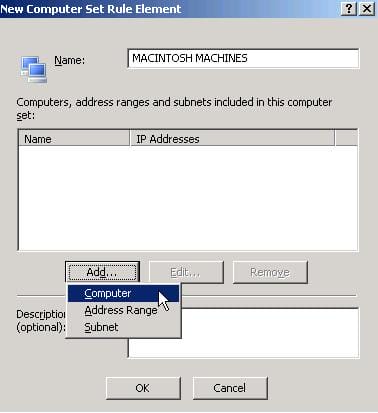
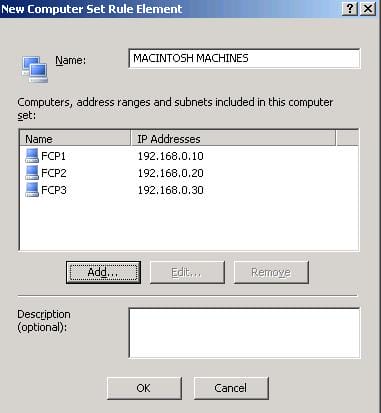
Once you finish adding all the machines inside the Computer Set, click on OK, and from the Add Network Entities page, expand Computer Sets folder, and you will see the new computer set that we created, click on it and then click Add. The MACINTOSH MACHINES computer set will be added in the Access Rule Sources page, Click Close to close the Add Network Entities page then click Next
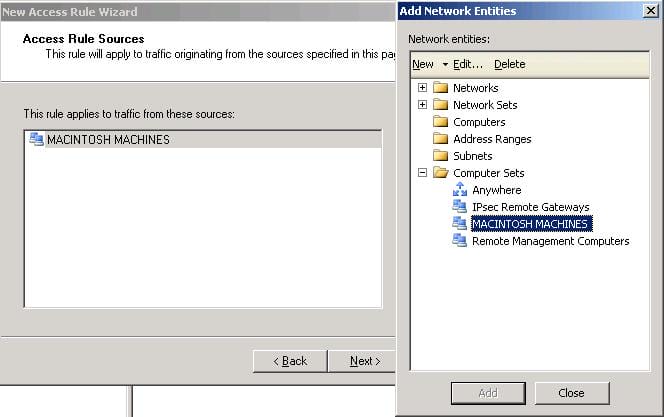
On the Access Rule Destination page, click on the Add button, the Add Network Entities page will open, expand Networks folder, and then click on External , click Add to add the External Network entity for the Access Rule Destination, once added, click on Close to close the Add Network Entities page, and then click Next on the Access Rule Destination page
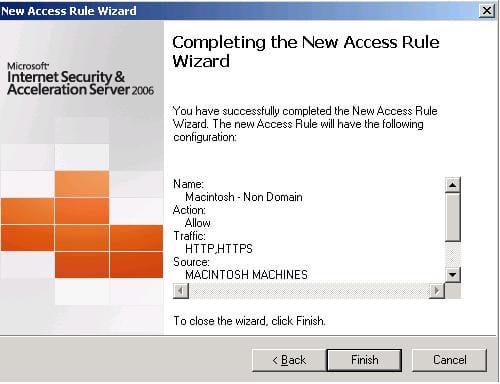
On the User Sets page, keep the default group, All Users. We will not add any other group, because SecureNet clients can not authenticate and hence we need to use the All Users group, click Next
Review the summary of the rule and then click on Finish
Make sure that anonymous rules, rules created with the condition All Users is above rules that require authentication, in our case, we need to put the new created rule above the Allow Internet- Domain Users rule, you can change the order of the rules by clicking on the up down arrows
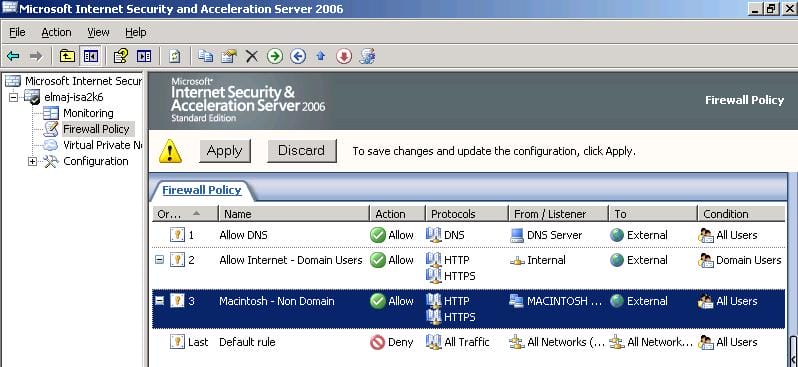
Highlight the rule you want to change its order by clicking on it, and then click the up/down arrow. Once the order is done, click the Apply button so that changes take effect.
Summary
Not only Windows Operating Systems can connect to ISA Server, non windows machines can connect too. You can set them as Web Proxy client and/or SecureNet client. Although in this article I have only covered Macintosh machines, the same steps can be followed to set any client as SecureNet or Web proxy client, as the configurations on ISA Server is the same regardless of the client operating system. The only difference from one operating system to another, is the way to set the default gateway or the proxy settings.
Related links