

Introduction
Many people have asked over the years how to block selected File downloads, based on Extension and/or Content Type
Background
This is most useful when you need to block streaming media, you can use the combination of blocking Extensions and Content Types.
Configuration
1. Open ISA Management Console
2. Create a new Access rule, Right click Firewall Policy , then click on New then choose Access Rule

This also can be done from the Right Pane, under the Tasks bar:

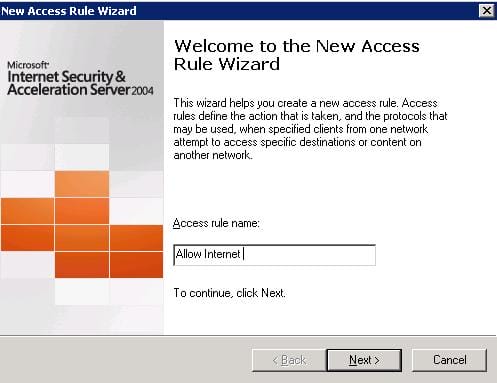
3. The New Access Rule Wizard will be launched, give a name to your new rule , in this example we will name it Allow Internet, then click Next
4. In the Rule Action page, we choose which action we want to grant for our users, first we need to create the allow rule that will allow them to have internet access, so we choose Allow, then click Next
5. I always prefer not to grant users an open rule, in this I mean a rule with all outbound protocols, that’s why I always prefer to grant my users a selected protocols for each rule. In the Protocols page, From the drop down list of This Rule Applies To, choose Selected Protocols,

click on Add button, the Add Protocol page will open, expand the Common Protocols container, choose the HTTP, HTTPS, POP3 & SMTP ( these are the most common protocols used, you can have any other protocols as desired ) protocols and click on Add , then click Close

The selected protocols will be displayed in the Protocols page, click Next
6. On the Access Rule Sources page, click the Add button. In the Add Network Entities dialog box, click on the Networks folder. Double click on the Internal network, then click the Close button in the Add Network Entities dialog box. Click Next in the Access Rule Sources dialog box.

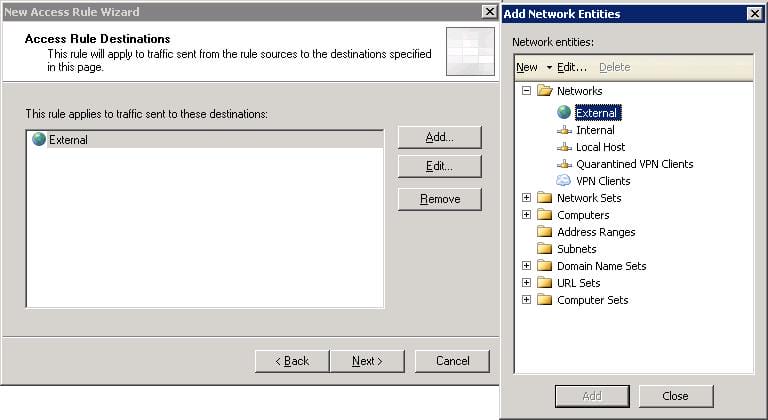
7. Click the Add button on the Access Rule Destinations page. In the Add Network Entities dialog box, click the Networks folder. Double click the External entry and click Close in the Add Network Entities dialog box. Click Next on the Access Rule Destinations page.
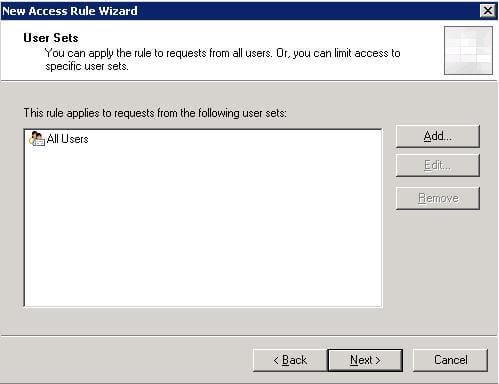
8. On the User Sets page, accept the default setting of All Users.
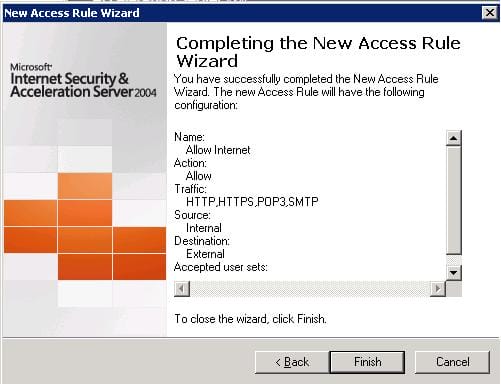
9. Review your settings and click Finish on the Completing the New Access Rule Wizard page.
10. Click the Apply button to save the changes and update the firewall policy. This button is located at the top of the Details pane (the middle pane) of the console.
11. Your rule will look this :

12. The rule you have just created will permit your users to surf the Internet with only the selected protocols, but your users will be able to download whatever they want !! so what you need to do is to filter such ability by File Extension and/or Content Type.

13. Right click your Allow Rule, then click on Configure HTTP
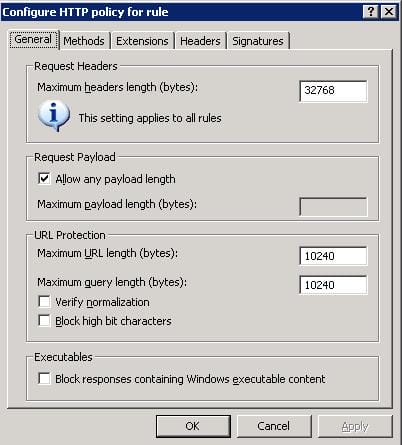
14. The Configure HTTP Policy page will open In this article we will only discuss the Extensions Tab , for more info on the Configure HTTP Policy check the related links at the end of this article.
15. Click on the Extensions Tab, then from the drop down list choose Block specified extensions (allow all others).

16. Click on the Add button  In this page, start adding the extension you desire to block, such as wmv, avi and so on.
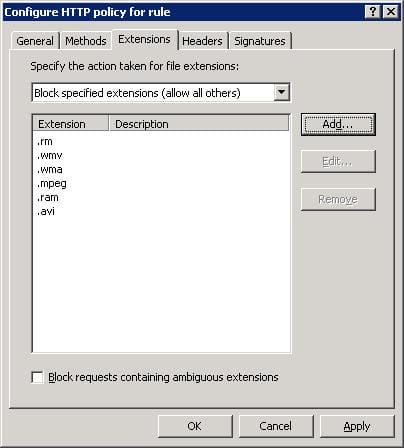
After you finish from filling the extensions you desire to block , click on OK
17. Click the Apply button to save the changes and update the firewall policy.

18. We finished now with the Extensions part, now if you need also to block by Content Type, double click on the Allow Internet rule

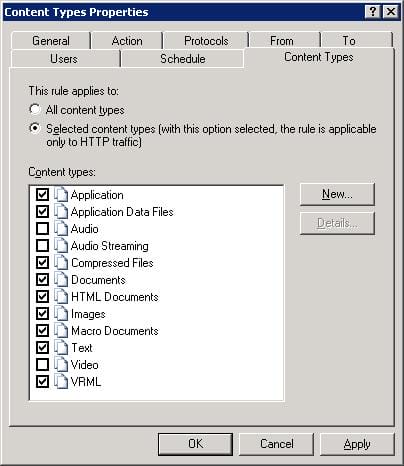
Then click on the Content Types Tab

19. By default, all Content types are enabled, what we need to do now is to select only the ones we need to be enabled on this rule, that’s why we need to enable the radio button beside the Selected content types ( with this option selected , the rule is applicable only to HTTP traffic ) under the This rule applies to
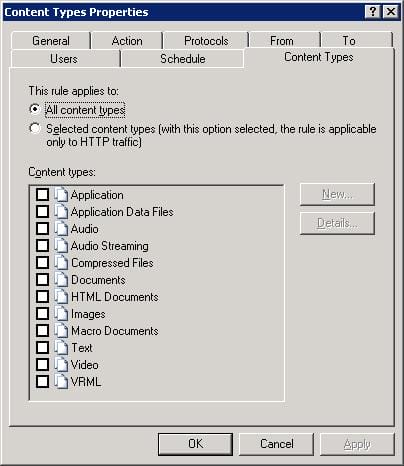
20. Start selecting the content types you want to enable, in this article, we do not want to enable streaming content types, so we leave the audio and video content types deselected. After you finish from selecting, click on OK
21. Click the Apply button to save the changes and update the firewall policy.

Summary
In this article, we learned how to create a new Access Rule, and how to filter this allow to block selected extensions and content types.